
Individual Rigid Body Forces
For this post, I wanted to see if I could have more control over the movement of each piece of a rigid body simulation. This process works well, runs efficiently, and you can do some pretty cool things with this setup. It works by creating a set of paths for each rigid body, and custom forces will push each piece towards and along your specified paths.
HIP HOP

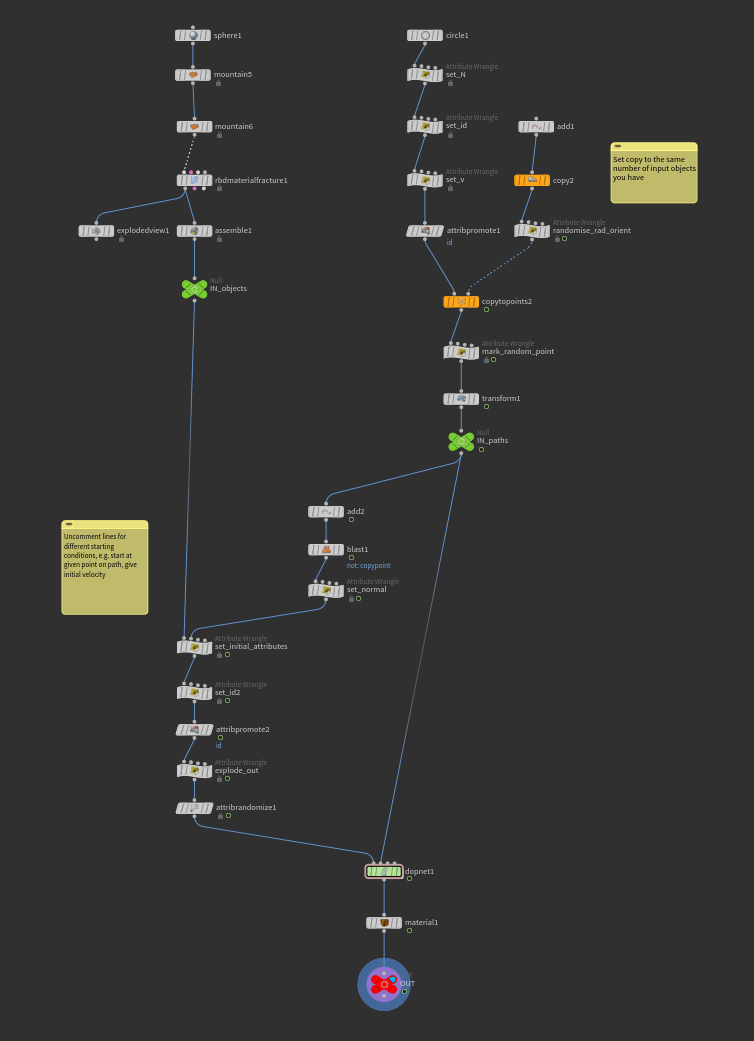
When creating a basic rock, using a mountain SOP the Worley noise type gives good hard edges for high level detail. Input this to the RBD material fracture node to break it apart. Assemble and pack, taking note of how many pieces are created.
Now start another branch, beginning with an open arc circle. In order to get a velocity following along the circle, we need the tangent. There are two ways to do this, one is to simply point it to the next neighboring point, or you could do it the pointless but technically more accurate way. Lets do that. Start by setting a vector attribute in an arbitrary direction, e.g. along z axis. Then point another vector towards the center. Finally, create the tangent by taking the cross product of the previously created vectors and set it as velocity. As both prior vectors are at right angles, this third vector will be tangent to the circle.
Now create a set of points, all starting at the origin. Use a copy node to achieve this, setting to the same number of rock pieces you have. For each point, randomise the orientation (check out Matt Estella’s CG Wiki for a great explanation) and radius, and set a name for each. Copy the circle to each of these points.
wrangle wrangle wrangle wrangle wrangle wrangle

Each segment of rock will follow one of these paths. From each circle, select one random point, or mark one in the original circle. Using this group of points, you can transfer the name to each of the rocks simply using the current point numbers from each group (they should match). From here, you can customise a number of different inputs. For example, you can move the rock pieces to the random points and initialise velocity, or you can keep centered and set initial velocity and angular rotation to make it look like an explosion. Or come up with some crazy other starting conditions, but either way, feed the pieces into a dopnet along with the circles on the second input.
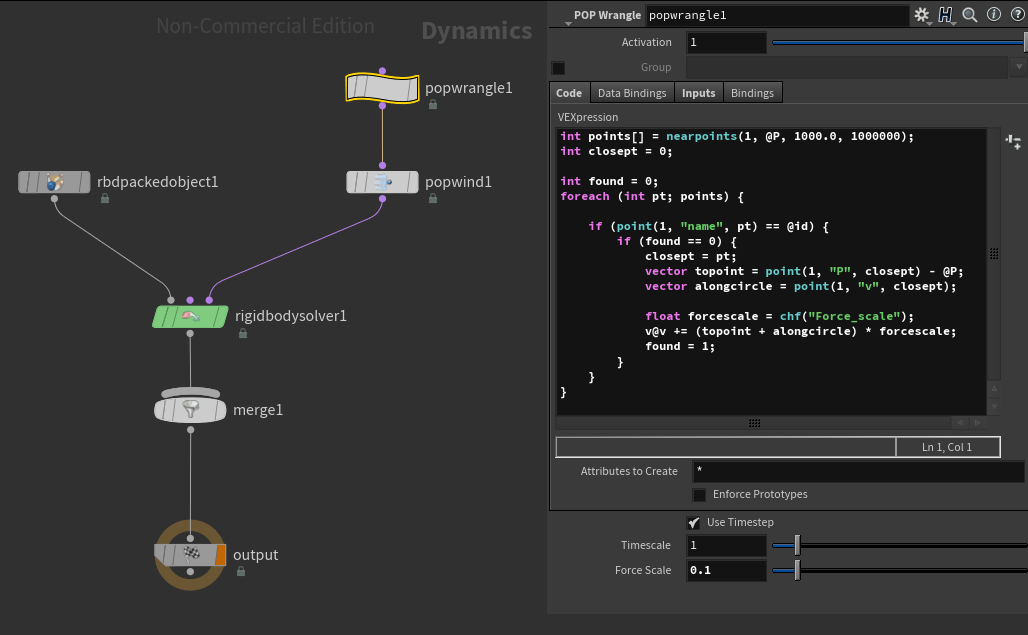
Inside the dopnet, set an RBD packed object to your input objects as normal. Now on the post-solve branch, place a pop wrangle. Inside here, create an array of all points incoming on the second input. Using the nearpoints function, they will be sorted in order of distance. Make sure you have a large enough radius and enough points (or not, e.g. see below how a bunch rush to the same spot, kinda funky). Go through each point, and find the first point whose name matches the current pieces name. Now you can update the velocities. Using whatever scale desired, add the vector towards that point, and the velocity stored at that point, to the current object. This allows the two additional forces to be added, whilst still maintaining collisions.
OK I may have slightly lied about this being efficient, but I couldn’t think of another way to achieve this effect, and honestly the solves don’t take too long. I hope to do some cool stuff for the animation using this method so stay tuned! (but not too tuned, could be a long time).
